Summary
Over the past few months, I’ve been part of a project team to migrate an on-premises IP PBX to the Microsoft Teams cloud-based phone system. One component of this project is the Enhanced 911 (E911) service. E911 enables the capability to automatically provide the location information of the caller to the Public Safety Answering Point (PSAP) when an emergency call to 911 is placed.
Any multi-line phone system implemented today must provide dispatchable location information. Recent regulation in Kari’s Law and RAY BAUMS’s act detail the compliance requirements.
To provide this information, the phone endpoint – a “softphone” Teams client on a laptop, or a physical wired IP handset – collects various pieces of information about the network to which it is connected. This data, such as the client’s IP address, MAC address and port name of the local Ethernet switch, and MAC address of the associated wireless access point, is provided to the phone system when an emergency call is placed. The phone system uses this data to look up the physical location in a database and send it to the PSAP operator.
This location data, such as physical location of wireless access points, street addresses of buildings, and location of Ethernet wall jacks, is all maintained in the NetBox database. With a few custom fields, export templates, and a bit of code, I was able to build a workflow that keeps this information current in all participating systems without significant additional operational burden on the Networking team.
I’m sharing some of this work in case it would benefit anyone else on a similar journey, including sample code and output, with fictional example data.
Network Information
The important pieces of data that the phone endpoints collect are:
- IP address of phone endpoint
- MAC address and Port Name of the Ethernet switch
- MAC address of associated wireless access point (AP)
The IP address can easily be obtained from the local network stack. Similarly, the AP MAC address, specifically its BSSID, can be obtained from the local wireless network driver.
The switch MAC address and port name are learned by passively listening to multicast LLDP frames on the local network. In the case of a soft phone, a separate service is installed that collects this information and provides it to the local phone application.
LLDP
LLDP is a vendor-neutral protocol, and is implemented by pretty much any access layer switch you may use. In some cases, it may not be enabled by default.
For example, to enable on a Cisco IOS switch:
lab3850-sw-1#conf t
Enter configuration commands, one per line.  End with CNTL/Z.
lab3850-sw-1(config)#lldp run
lab3850-sw-1(config)#end
lab3850-sw-1#sh lldp

Global LLDP Information:
    Status: ACTIVE
    LLDP advertisements are sent every 30 seconds
    LLDP hold time advertised is 120 seconds
    LLDP interface reinitialisation delay is 2 seconds
The switch will periodically send out multicast frames with much information about itself, including its MAC address and the name of the port transmitting the frame.

The Interface name (Gi1/0/27) is provided in the Port ID TLV
The phone also learns the 802.1q tag of the voice VLAN from the LLDP data, and will use this to automatically configure tagging its voice traffic to a separate VLAN as configured on the switch. In many cases, it also sends LLDP frames itself, which are useful for power management and troubleshooting.
Design
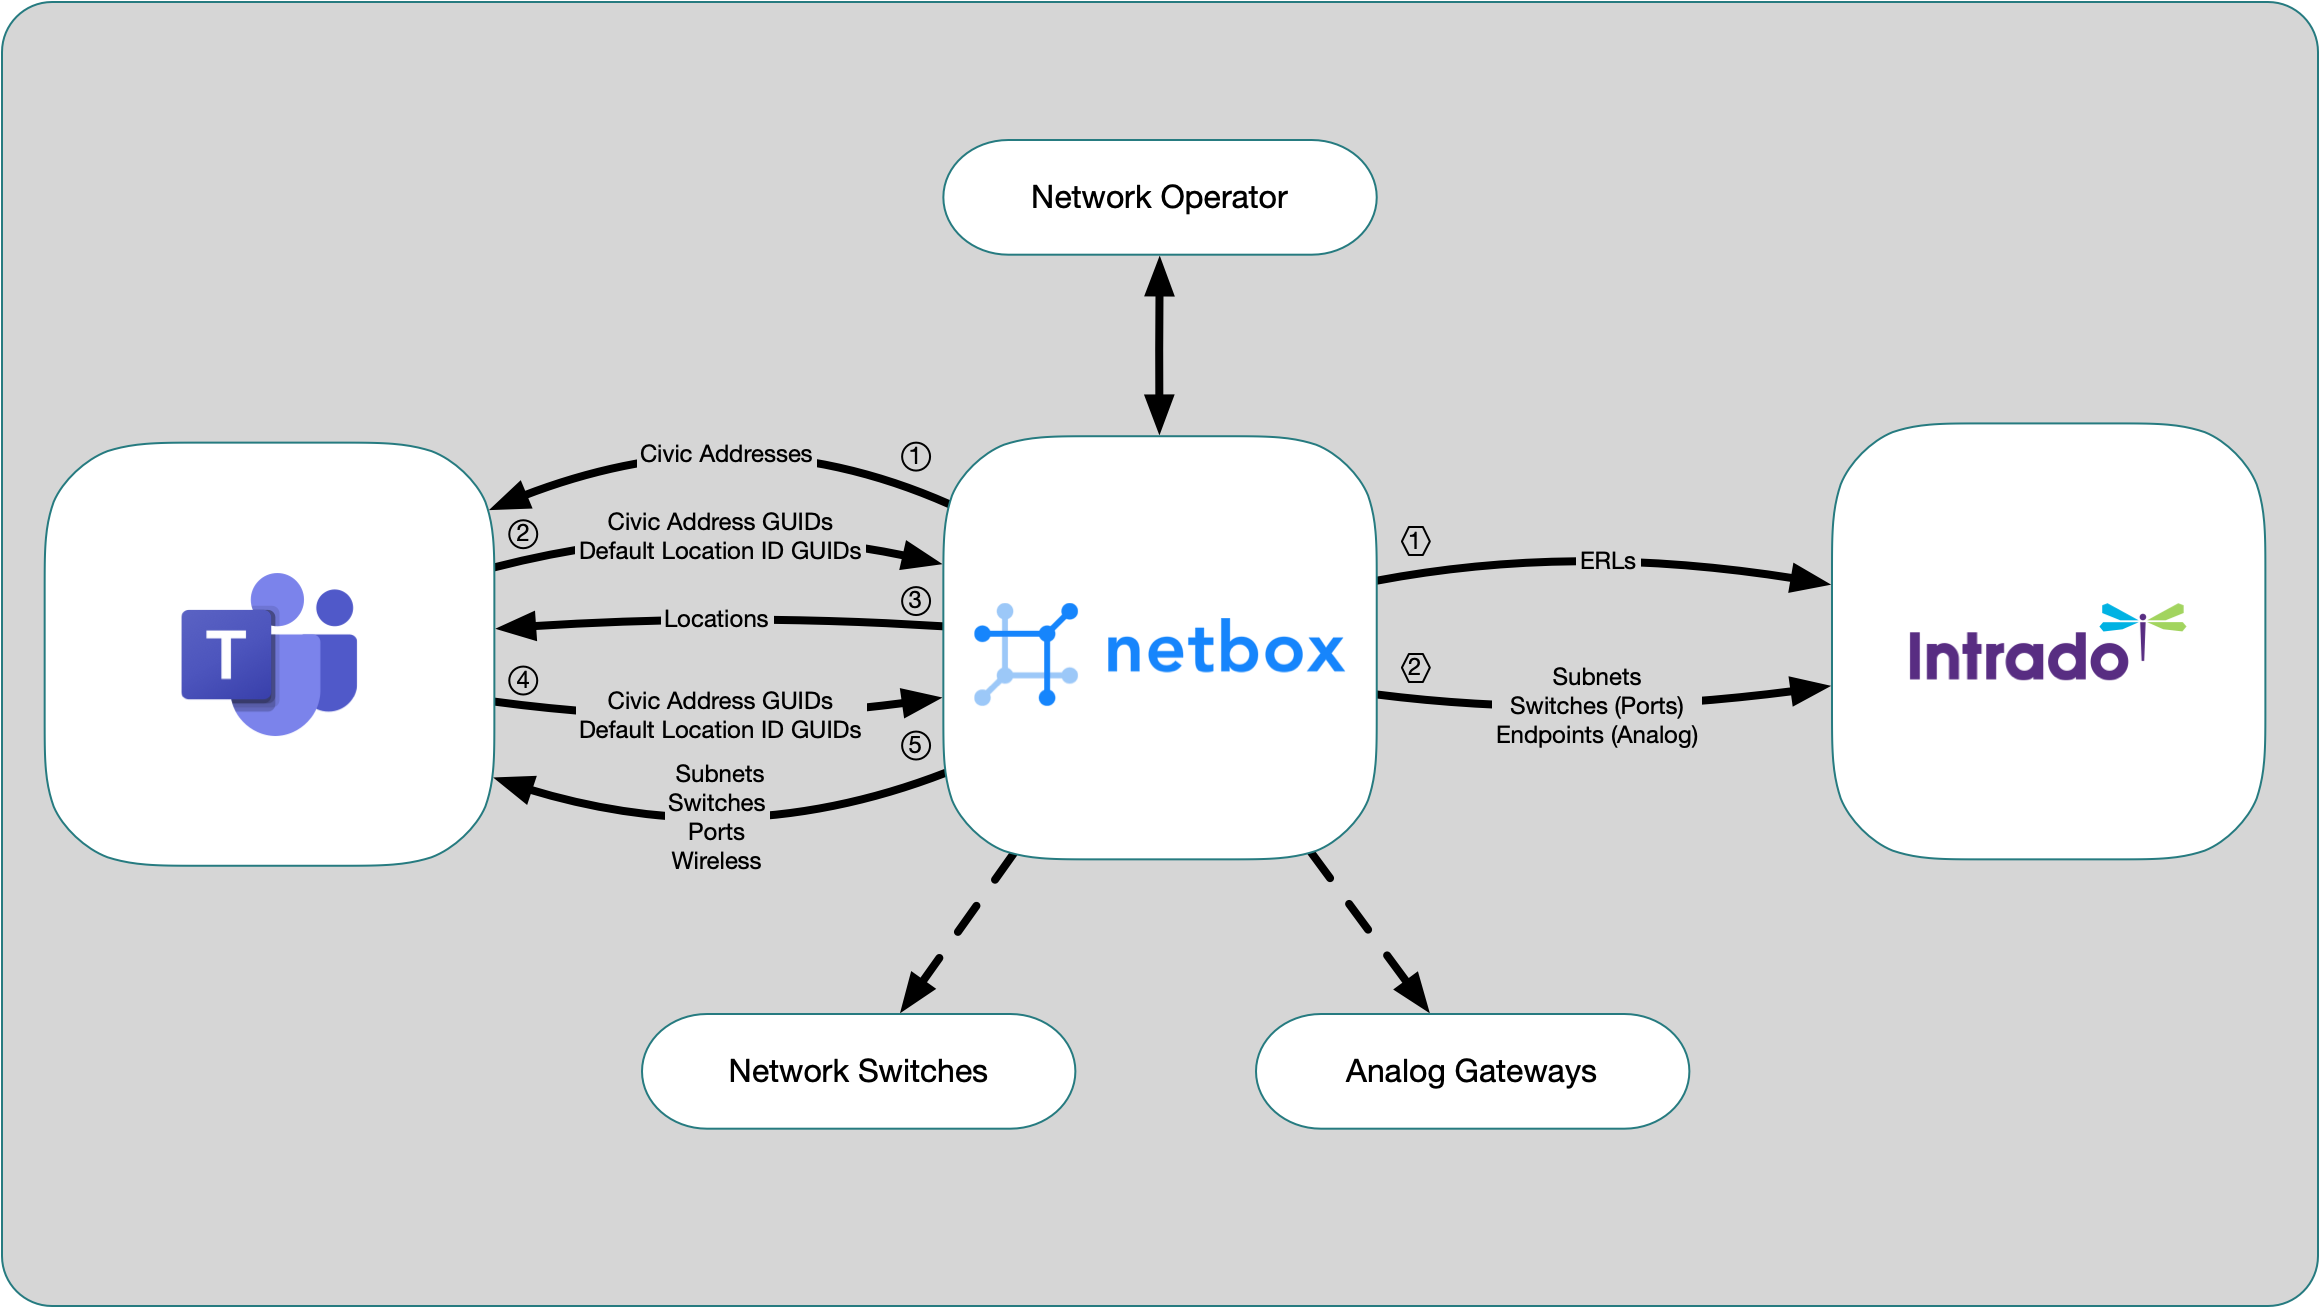
NetBox already has much of the required data. We augment it with a few custom fields and some scripts to populate any missing information.
Teams and Intrado each have their own database(s) to hold location information. They have different data models (from each other and from NetBox) for representing this information. They each provide an API for accessing and updating this data, so this integration can be programmatically scripted to keep the E911 data current.
I considered writing one big script that would interact directly with each of the three services’ APIs and update/synchronize the data as needed. This turned out to be a tough sell to the organization, so I opted to divide it up into smaller pieces. By adding a few custom fields, NetBox held all the information needed for me to create export templates for each type of data Teams and Intrado requires.
The advantage of this model is that the export templates produce CSV files in the format expected by each of the other services. Since there are three separate groups responsible for maintaining each of the systems (NetBox, Teams, and Intrado), it allows a clear point of demarcation between these groups. The export templates are completely self service, and can be consumed when and how each group desires.
Components
There are three main components:
- NetBox
- Microsoft Teams
- Intrado Emergency Gateway (EGW)
All primary data is entered into NetBox. Most of this was already existing, but some, such as the E911 display text, needed to be added with custom fields. Data can be exported directly to the EGW, as long as the ERLs are done first. Teams exports require that the Microsoft-generated unique identifiers (for CivicAddresses and Locations) are imported back into NetBox before the other objects can be exported to Teams.

Microsoft Teams
Microsoft Teams Calling is a cloud-based PBX. Using the Direct Routing PSTN option, it can connect with the customer’s SBCs for on-premises connectivity of the Microsoft Teams Client and physical Teams phones.
Microsoft Teams maintains a Location Information Service (LIS), that stores the following objects:
- Civic Addresses
- Places / Locations
- Subnets
- Switches
- Ports
- Wireless Access Points
This data is accessed using the Skype for Business PowerShell
module, which is included in the MicrosoftTeams
PowerShell module. This module provide cmdlets which allow for
creating, updating, and deleting these objects in the LIS. Microsoft
also provides a web interface for ad-hoc viewing/editing of this data in
the Teams admin center.

Networking information from the phone endpoint is used to select the location data for match against these objects. The match is performed in the following order, with the first successful match result being used:
- Wireless Access Point
- Switch/Port combination
- Switch
- Subnet
Civic Addresses
Civic Addresses are “the physical or street address of a place of business for your organization.” The example listed in the documentation is 12345 North Main Street, Redmond, WA 98052. These are buildings with a unique street address. This is the base object in the LIS. All other objects, either directly or indirectly, reference the Civic Address.
Places / Locations
Places are “typically a floor, building, wing, or office number
[…] to give a more exact location within a building.” When a
Civic Address is created, a DefaultLocation is created which
allows other objects to be associated with the Civic Address when
no more-specific locations are defined. (Microsoft seems to use
Places and Locations interchangeably; to avoid confusion, I use
the term Locations exclusively.) Each Location references the
CivicAddressID GUID that contains it.
Subnets
Subnets are IPv4 and IPv6 CIDR blocks that contain the local IPs
of the phone endpoints. Each subnet references a LocationID GUID.
Note that “LIS subnets must be defined by the Network ID matching the
subnet IP range assigned to clients.” That means that the value for
the 192.0.2.0/25 subnet would be 192.0.2.128.
Switches
Switches are identified by the ChassisID in EUI-48
format (00-53-00-12-ab-cd) of the network switch to which the phone
endpoint is connected (as reported by LLDP). Each switch references a
LocationID GUID.
Ports
Ports are identified by the PortID and ChassisID of the switch
interface to which the phone endpoint is connected (as reported by LLDP).
Each port references a LocationID GUID.
Wireless Access Points
Wireless Access Points are identified by the BSSID of the access
point radio to which the endpoint has associated. Each AP references a
LocationID GUI.
Intrado Emergency Gateway
The Intrado Emergency Gateway (EGW) is a pair of on-premises servers that coordinates collection of E911 location information, unifies emergency calling for multiple PBX systems, and facilitates routing of calls and notifications to a local communications center while a call is connected to the PSAP. It also provides an alternate/backup call path for emergency calls in the case when the main PSTN trunks are unavailable.
The EGW maintains a database of location information that stores the following objects:
- ERLs
- Switches and Ports
- Subnets
- Endpoints
- WLANs
This data is accessed via SOAP API endpoints on the EGW. API Documentation is dated and sparse. Between reading the API PDF, browsing the WSDL files, and some trial and error, I was able to put together a working python module to programmatically update the database. The EGW dashboard provides a device-hosted web-interface to manage the individual location objects and perform batched operations on the database.

In our use case the EGW replaces a Cisco Emergency Responder deployment. They have similar functionality and features, but the EGW is a platform that supports devices on both phone systems. During a multi-year migration process, this provides unified administration for operations and a single interface for security personnel.
ERLs
ERLs are Emergency Response Locations, from a general street address
to more specific data including floor and room information. The primary
key to this is the ERL_ID, an all-caps alphanumeric value. This is
the base object in the EGW. All other objects directly reference an
ERL.
Switches and Ports
Switches are identified by the IP address of the switch and name
of the switch port to which the phone endpoint is connected. This is
a confusing name, I think, because it represents the ports, not the
switch. A default location for all (otherwise unspecified) ports on
a switch may be indicated by providing a wildcard * value for the
port_name field.
SNMP credentials are also associated with these entries so that the EGW can periodically poll the switches’ CAM tables to collect MAC-to-port mappings. This allows the EGW to locate endpoints that are identified by MAC address.
Subnets
Subnets are a list of IPv4 prefixes in CIDR notation that
contain the local IPs of the phone endpoints. Each entry is a list
of subnets associated with an ERL_ID.
Endpoints
Endpoints are the IP PBX phone endpoints. In the EGW data model,
they are identified by the IP PBX name and (one of) extension, IP, or
MAC address. Each endpoint references the ERL_ID of its physical
location.
Intrado provides a PowerShell script that will synchronize extensions from Teams to the EGW. In our deployment, all other endpoints are analog lines managed by the Cisco PBX. These are
Wireless Access Points
WLANs are Wireless Controllers and Access Points. This is a similar model to switches and ports. Controllers are defined by vendor, IP address and SNMP credentials, with a list of SSIDs and a default ERL. The EGW will poll the wireless controller(s) to get a list of APs and BSSIDs. Individual entries are either automatically or manually created for each AP/BSSID, and are associated with a specific ERL.
We do not have devices of this type in our deployment (all wireless endpoints are Teams phones), so I did not create any export templates in NetBox and did not (yet) add support for the WLAN endpoint in pyegw. If needed, these could be added by modifying the E911_Teams_WirelessAccessPoints export template and the pyegw switches API, respectively.
NetBox
NetBox is a DCIM and IPAM tool for modeling infrastructure and serving as a source of truth for the desired state of the network.
The high-level objects in NetBox relevant to this integration are:
- Sites
- Locations
- Devices
- Interfaces
- Prefixes
- Cables
Sites
NetBox allows organizing objects into Regions, Site Groups, Sites, and Locations. The way these may be used can vary greatly to accommodate different organizations’ needs. Our implementation uses Sites to represent physical buildings and Locations to represent places (such as floors or rooms) within a building. In a few cases, we have groups of buildings that are treated as one logical site from a network topology perspective. These sites are part of a site-group, which allows assigning VLANs and prefixes to the group.
The native Site object has physical_address and latitude/longitude
fields. Since these are in a standardized, consistent format, they can
be parsed into the fields needed by Teams and the EGW.
Locations
Locations are a hierarchical object representing individual “places” within a Site. These are assigned to floors and rooms in the building. A single location for each site, called “Exterior” is used for ports and devices mounted on the outside of the building.
Devices
Devices in NetBox are any piece of tracked hardware, from a patch panel to a router. They are sub-classified into device types. For this project, we are concerned with types defined for access switches, access points, analog gateways, and faceplates. Each device is assigned a Site and a Location.
Interfaces
Interfaces are the physical and logical interfaces on devices.
Prefixes
Prefixes are IPv4 and IPv6 networks. NetBox associates a prefix with a VLAN.
Cables
Devices can be connected to each other via cables between their interfaces and ports. This allows, for example, querying the location of a faceplate connected to a particular interface of an access switch.
Customization
NetBox does not have native support for fully tracking E911 data, but much of its core functionality maps directly to the data needed integrate it with both Teams and Intrado. NetBox provides extensive customization features to extend the data model with custom fields and export to outside systems via export templates.
Custom Fields
Custom Fields are additional attributes that are stored and associated
alongside each object in the NetBox database. They are associated
with one or more types of objects (content_types) and may have their
values specified by type and restricted by a regular expression
(validation_regex). For the most part, they can be used like native
fields for whatever custom purpose the organization needs.

For this project, we use a few custom fields:
- e911_display
- e911_elin
- e911_guid
- e911_default_location
- chassis_mac
- aggregation_site
e911_display
Since some PSAPs have a limited-size display for location information,
the full text of the location may end up being truncated. A
e911_display field is created for this abbreviated data. As a College
Campus, many of the buildings are primarily known by their building
name, typically a benefactor or honoree, rather than their street
address. Additionally, the presence (or not) of a value in this field
can be used to filter those objects that should not be exported to other
systems, such as lab devices and ports.
---
content_types:
- dcim.location
- dcim.site
- dcim.sitegroup
type: text
name: e911_display
label: E911 Display Text
filter_logic: exact
e911_elin
A emergency location identification number is used both by
Teams (ELIN) and by EGW (erl_id). Strictly speaking, a ELIN
should be a phone number in NANP format. Instead, we follow
Microsoft’s example and use this field as an organization-specific short
alphanumeric string to identify a CivicAddress or ERL.
We standardized on an all-caps string, <buildingname> or
<buildingname>_<location>. Some examples:
ORKAN: Orkan House buildingORKAN_FL03: Third Floor of Orkan HousePINETREE_FL00: Basement of Pine Tree CenterPINETREE_EXT: Exterior of Pine Tree Center
---
content_types:
- dcim.location
- dcim.site
type: text
name: e911_elin
label: E911 ELIN
filter_logic: exact
validation_regex: ^[0-9]*[A-Z]+(_(EXT|FL\d\d))?$
e911_guid
When a new CivicAddress is created in Teams, a unique identifier
CivicAddressId is created. This value is used for any subsequent
reference to that object in Teams. To be able to express these
relationships in the export CSV, NetBox needs to track these GUIDs alongside
Similarly, when a Location is created in Teams, another unique
identifier LocationId is created for that object. Since these are
the same format and associated with different object types in NetBox
(sites/site-groups and locations), we use the same custom field for
both.
---
content_types:
- dcim.location
- dcim.site
- dcim.sitegroup
type: text
name: e911_guid
label: E911 Teams GUID
filter_logic: exact
validation_regex: ^[a-f0-9]{8}-[a-f0-9]{4}-[a-f0-9]{4}-[a-f0-9]{4}-[a-f0-9]{12}$
e911_default_location
In the Teams data model, a particular CivicAddress might not have any
Locations defined but still need to have other objects (such as Subnets)
associated with it. When a CivicAddress is created a default location
identifier DefaultLocationId is generated as a Location GUID that
references the entire building.
---
content_types:
- dcim.site
- dcim.sitegroup
type: text
name: e911_default_location
label: E911 Teams Default Location
filter_logic: exact
validation_regex: ^[a-f0-9]{8}-[a-f0-9]{4}-[a-f0-9]{4}-[a-f0-9]{4}-[a-f0-9]{12}$
chassis_mac
Teams uses the switch MAC address (as reported via LLDP) to uniquely identify the switch. The native device object in NetBox does not include a MAC address attribute (only interfaces). A custom field and a small script to gather this data from deployed switches solves this limitation.
lab3850-sw-1#show switch
Switch/Stack Mac Address : 0c27.2497.ef00 - Local Mac Address
Mac persistency wait time: Indefinite
                                             H/W   Current
Switch#   Role    Mac Address     Priority Version  State
-------------------------------------------------------------------------------------
*1       Active   0c27.2497.ef00     15     V02     Ready
 2       Standby  046c.9dc4.6e00     14     V05     Ready
MAC addresses are not one of the types currently available for custom fields, so we’ve implemented this as a text field with regex validation.
---
content_types:
- dcim.device
type: text
name: chassis_mac
label: Chassis MAC Address
filter_logic: loose
validation_regex: ^([0-9a-f]{2}:){5}([0-9a-f]{2})$
aggregation_site
As mentioned earlier, in a few cases we have groups of physical
buildings that are, from a network perspective, a single logical
site (site-group). Similar to how a multi-floor building may
have IDFs on each floor with a central MDF containing
aggregation switches and backhaul to the campus hub, these groups of
buildings have a primary building performing this aggregation role.
This custom field is an indicator that a particular site is performing
this role for the other sites in its site group.
This functionality may be better implemented now using the custom object field feature new in Netbox v3.2. I’m planning to review the code that uses this field to plan a migration.
---
content_types:
- dcim.site
type: boolean
name: aggregation_site
label: Aggregation Site
description: This site is the aggregation site for its site group
filter_logic: disabled
Export Templates
Export Templates are custom jinja templates that can render a list of objects and their attributes and relations into a custom-formatted report. We use these to generate CSV files that can be imported into Teams or EGW to synchronize/update the location data.
Each export template is assigned to one type of object (content_type)
and is configured to provide a downloadable attachment. These endpoints
are available in both the GUI and in the API. Filters may
be applied to limit the queried results to aid in troubleshooting or
selective exports, ether directly in the GUI or by appending to the
query string. For example, appending ?region=ny to the CivicAddresses
export URL would limit the report to any sites in New York.

The following export templates were created for Teams integration:
- E911_Teams_CivicAddresses
- E911_Teams_Locations
- E911_Teams_Ports
- E911_Teams_Subnets
- E911_Teams_Switches
- E911_Teams_WirelessAccessPoints
The following export templates were created for EGW integration:
- E911_EGW_ERLs
- E911_EGW_Subnets
- E911_EGW_Switches
- E911_EGW_Analog

This data can then be imported into Teams and the EGW. Teams provides
a suite of cmdlets in its SkypeForBusiness PowerShell module, allowing
us to query the NetBox API and update Teams from a single script. EGW
provides a SOAP API. Using a pyegw module wrapping these calls into
python class methods allows us to have another script that synchronizes
objects from NetBox to the EGW. Rather than show the full logic of
these scripts, I’ll show a snippet of code alongside each export
template for importing that object.
E911_Teams_CivicAddresses
The CivicAddresses export is associated with the Site object and generates a CSV file for import into Teams.
---
content_type: dcim.site
name: E911_Teams_CivicAddresses
description: For import into Teams
mime_type: text/csv
file_extension: civicaddrs.csv
as_attachment: true
HouseNumber,Description,StreetName,City,StateORProvince,PostalCode,CountryOrRegion,CompanyName,ELIN,Latitude,Longitude
{% set company = "Splinking University" -%}
{% for site in queryset | rejectattr('cf.e911_display', 'equalto', None) -%}
{%     set street,city,statezip = site.physical_address.split(",") -%}
{%     set address = street.split() -%}
{%     set housenumber = address[0] -%}
{%     set streetname = address[1:] | join(' ') -%}
{%     if '#' in streetname -%}
{%         set streetname,number = streetname.split('#') -%}
{%         set number = '#' + number -%}
{%     endif -%}
{%     set state = statezip.split()[0:-1] | join(' ') -%}
{%     set zip = statezip.split()[-1] -%}
{%     set lat = "{0:0.4f}".format(site.latitude) -%}
{%     set lon = "{0:0.4f}".format(site.longitude) -%}
{{ housenumber }},{{ site.cf.e911_display }},{{ streetname | trim }},{{ city | trim }},{{ state |trim }},{{zip}},US,{{ company }},{{ site.cf.e911_elin }},{{ lat }},{{ lon }}
{% endfor -%}
Only sites with a e911_display value are exported. Since NetBox
stores its physical address as a single field and Teams expects it
as individual fields, we need to do some string manipulation on the
text field. The description and ELIN are from the e911_display and
e911_elin custom fields of each site. GPS coordinates are formatted
to the maximum precision allowed by Teams.
$ cat netbox_sites.civicaddrs.csv
HouseNumber,Description,StreetName,City,StateORProvince,PostalCode,CountryOrRegion,CompanyName,ELIN,Latitude,Longitude
1619,Orkan House,Pine Street,Boulder,CO,80302,US,Splinking University,ORKAN,40.0213,-105.2749
The output file can be directly imported into Teams using the New-CsOnlineLisCivicAddress PowerShell cmdlet. Then the site and default location GUIDs can be shown. These must be imported into NetBox before proceeding with Locations.
Import-Csv -Path netbox_sites.civicaddrs.csv | New-CsOnlineLisCivicAddress
Get-CsOnlineLisCivicAddress |
    Select-Object -Property Elin,CivicAddressId,DefaultLocationId |
    Export-Csv -Path "CivicAddresses.csv"
$ cat CivicAddresses.csv
"Elin","CivicAddressId","DefaultLocationId"
"ORKAN","332d58e1-ea3f-417b-8d89-730fc80eb47f","bf68677d-bbc9-4976-9b56-70bd9e9aec43"
Please note that that there is also a Set-CsOnlineLisCivicAddress cmdlet, but per the documentation can only be used to “modify an existing civic address which has not been validated.” Once an entry has been validated by Microsoft, it cannot be changed and will need to removed and added anew. Since all other objects depend on the CivicAddress, they will all need to be changed/removed before the CivicAddress can be deleted. From experience, make sure you get these right before you import all your data.
E911_Teams_Locations
The CivicAddresses export is associated with the Location object and generates a CSV file for import into Teams.
---
content_type: dcim.location
name: E911_Teams_Locations
description: For import into Teams
mime_type: text/csv
file_extension: locations.csv
as_attachment: true
CivicAddressID,Location,ELIN,Latitude,Longitude
{% for loc in queryset | rejectattr('cf.e911_display', 'equalto', None) -%}
{%     set display = loc.site.cf.e911_display ~ " " ~ loc.cf.e911_display -%}
{%     set guid = loc.site.cf.e911_guid -%}
{%     set lat = "{0:0.4f}".format(loc.site.latitude) -%}
{%     set lon = "{0:0.4f}".format(loc.site.longitude) -%}
{{ guid }},{{ display }},{{ loc.cf.e911_elin }},{{ lat }},{{ lon }}
{% endfor %}
Only locations with a e911_display value are exported. Each Location
references the CivicAddress GUID for the building that it is in. The
site and location e911_display values are concatenated for the
location name. For example,
$ cat netbox_locations.csv
CivicAddressID,Location,ELIN,Latitude,Longitude
85ed22fc-d270-4628-812b-a79dfa1a8be3,Orkan House 1st Floor,ORKAN_FL01,40.0213,-105.2749
85ed22fc-d270-4628-812b-a79dfa1a8be3,Orkan House 2nd Floor,ORKAN_FL02,40.0213,-105.2749
85ed22fc-d270-4628-812b-a79dfa1a8be3,Orkan House 3rd Floor,ORKAN_FL03,40.0213,-105.2749
85ed22fc-d270-4628-812b-a79dfa1a8be3,Orkan House Basement,ORKAN_FL00,40.0213,-105.2749
85ed22fc-d270-4628-812b-a79dfa1a8be3,Orkan House Exterior,ORKAN_EXT,40.0213,-105.2749
The output file can be directly imported into Teams using the New-CsOnlineLisLocation PowerShell cmdlet. Then the location GUIDs can be shown. These must be imported into NetBox next, before proceeding with synchronizing any other data.
Import-Csv -Path ./Downloads/netbox_locations.csv | New-CsOnlineLisLocation
Get-CsOnlineLisLocation |
    Select-Object -Property Description,Elin,LocationId |
    Export-Csv -Path "Locations.csv"
$ cat Locations.csv
"Description","Elin","LocationId"
"Orkan House","ORKAN","bf68677d-bbc9-4976-9b56-70bd9e9aec43"
"Orkan House","ORKAN_FL01","8bee0d2e-3773-44ef-9a5e-a944f7952505"
"Orkan House","ORKAN_FL02","80ad19c6-adde-4eeb-b7b7-2ba80b44952e"
"Orkan House","ORKAN_FL03","8e817e28-9c3e-4db5-ba41-51d7708ad7e3"
"Orkan House","ORKAN_FL00","73877105-2cdf-4df3-923f-1b9bfe61b8d4"
"Orkan House","ORKAN_EXT","b93f75bd-4fd2-4f09-9b23-ab611a993b40"
E911_Teams_Switches
The Switches export is associated with the Netbox device object and generates a CSV file for import into Teams.
---
content_type: dcim.device
name: E911_Teams_Switches
description: For import into Teams
mime_type: text/csv
file_extension: switches.csv
as_attachment: true
chassisID,Description,LocationID
{% for sw in queryset | selectattr('device_role.slug', 'equalto', 'access') | rejectattr('site.cf.e911_display', 'equalto', None) -%}
{%     set mac = sw.cf.chassis_mac.replace(':', '-') -%}
{%     set descr = sw.name -%}
{%     set loc = sw.site.cf.e911_default_location -%}
{{ mac }},{{ descr }},{{ loc }}
{% endfor %}
Only devices with a role of access switches and with a e911_display
value are exported. The desired MAC address format is slightly
different. When an emergency call is placed and there is no port name
match, the switch location will be used as a fallback. This references
the default location GUID because that port could be anywhere in the
building.
$ cat netbox_devices.switches.csv
chassisID,Description,LocationID
00-53-00-cf-fc-80,orkan-sw-1:1,bf68677d-bbc9-4976-9b56-70bd9e9aec43
00-53-00-c6-7d-80,orkan-sw-1:2,bf68677d-bbc9-4976-9b56-70bd9e9aec43
00-53-00-cf-76-80,orkan-sw-1:3,bf68677d-bbc9-4976-9b56-70bd9e9aec43
00-53-00-97-ed-80,orkan-sw-1:4,bf68677d-bbc9-4976-9b56-70bd9e9aec43
00-53-00-d3-b6-00,orkan-sw-1:5,bf68677d-bbc9-4976-9b56-70bd9e9aec43
00-53-00-64-e1-00,orkan-sw-1:6,bf68677d-bbc9-4976-9b56-70bd9e9aec43
00-53-00-70-16-80,orkan-sw-1:7,bf68677d-bbc9-4976-9b56-70bd9e9aec43
The output file can be directly imported into Teams using the Set-CsOnlineLisSwitch PowerShell cmdlet.
foreach ($sw in Import-Csv -Path "netbox_devices.switches.csv" ) {
    $sw | Set-CsOnlineLisSwitch -Description $sw.Description -LocationId $sw.LocationID
}
E911_Teams_Subnets
The Subnets export is associated with the Netbox prefix object and generates a CSV file for import into Teams.
---
content_type: ipam.prefix
name: E911_Teams_Subnets
description: For import into Teams
mime_type: text/csv
file_extension: subnets.csv
as_attachment: true
Subnet,Description,LocationID
{% set vrfs = ['administrative', 'academic', 'student', 'iptel' ] -%}
{% for p in queryset | rejectattr('vlan', 'equalto', None) | selectattr('vrf.name', 'in', vrfs) | rejectattr('vlan.group.scope.cf.e911_display', 'equalto', None) -%}
{%     set descr = ' '.join([ p.vlan.group.scope.cf.e911_display, p.vrf.name.capitalize().replace('Ip', 'IP')] ) -%}
{%     set loc = p.vlan.group.scope.cf.e911_default_location -%}
{{ p.prefix.ip }},{{ descr }},{{ loc }}
{% endfor %}
Only prefixes associated with a VLAN in a VRF that would have a phone
connected are exported. The vlan.group.scope references either the
site or site group. This allows us to get the e911_display and
default location GUID from the correct object, depending on whether this
VLAN is in one of the aggregation_site groups.
Teams expects the subnet IP, and not the CIDR of the prefix, so we use
the ip attribute of the Netaddr object.
Similar to Subnets, when an emergency call is placed and there is no match for the switch, the Subnet location will be used as a fallback. This references the default location GUID because that port could be anywhere in the building.
$ cat netbox_prefixes.subnets.csv
Subnet,Description,LocationID
198.51.100.0,Orkan House Academic,bf68677d-bbc9-4976-9b56-70bd9e9aec43
2001:db8:1234:4600::,Orkan House Academic,bf68677d-bbc9-4976-9b56-70bd9e9aec43
203.0.113.0,Orkan House Administrative,bf68677d-bbc9-4976-9b56-70bd9e9aec43
2001:db8:1234:4700::,Orkan House Administrative,bf68677d-bbc9-4976-9b56-70bd9e9aec43
10.90.16.0,Orkan House IPtel,bf68677d-bbc9-4976-9b56-70bd9e9aec43
The output file can be directly imported into Teams using the Set-CsOnlineLisSubnet PowerShell cmdlet.
foreach ($subnet in Import-Csv -Path "netbox_prefixes.subnets.csv" ) {
    $subnet | Set-CsOnlineLisSubnet -Description $subnet.Description
}
E911_Teams_Ports
The Ports export is associated with the Netbox device object and generates a CSV file for import into Teams. This is counterintuitive, as one would expect it to be associated with the interface object. It is done this way because Teams uses the MAC address to identify switches and the chassis MAC address is subject to change (in rare occasions) on Cisco switch stacks.
In normal operation, the chassis MAC of a switch stack will be that of its master switch. By standard operating procedure, we hardcode the switch member priority, so that is indeed deterministic. When a switch member fails – even if it was the master switch – the running stack retains the same chassis MAC. If, however, the stack was rebooted in this degraded state, a new stack-master would be elected and the stack would use its chassis MAC. There is a small but real chance of this scenario, so we populate a separate interface record for every member switch in the stack.
Generating the Cartesian product of MAC addresses and interfaces for
every stack with multiple queries in the jinja2 template takes a long
time. With over 60,000 records, it was taking longer than the default
timeout for nginx. Increasing proxy_read_timeout to 300 seconds
“fixed” the issue for us. If you know of a more efficient way to
perform this query from an export template, please let me know.
---
content_type: dcim.device
name: E911_Teams_Ports
description: For import into Teams
mime_type: text/csv
file_extension: ports.csv
as_attachment: true
ChassisID,PortID,Description,LocationID
{% for dev in queryset if dev.virtual_chassis.master == dev -%}
{%   set macs = dev.virtual_chassis.members.all() | map(attribute='cf.chassis_mac') | map('replace', ':', '-') | list  -%}
{%   for sw in dev.virtual_chassis.members.all() -%}
{%     for iface in sw.interfaces.filter(mgmt_only=False,enabled=True,mode='access') | selectattr('link.status', 'eq', 'connected') -%}
{%       set portid = iface.name.replace('GigabitEthernet', 'Gi') -%}
{%       set descr = ' '.join(iface.description.split('/')[0].split()[:-1]) -%}
{%       set loc = iface.path.last_node.device.location.cf.e911_guid -%}
{%       for mac in macs -%}
{{ mac }},{{ portid }},{{ descr }},{{ loc }}
{%       endfor -%}
{%     endfor -%}
{%   endfor -%}
{% endfor -%}
For each stack, we get a list of its member switches’ chassis_mac
addresses. Then, for every enabled access interface in the stack
that has a cable connected, we produce a port record for each of that
stack’s chassis_mac addresses.
Each port entry needs to use the format of the name as sent by LLDP,
which is slightly different than what is stored in NetBox. The
description is a substring of the interface description field which
contains the room name and other information. The location is
determined by tracing the cable path (through the patch panels and other
devices) to the last device in the path, and using the e911_guid from
its location.
$ head -3 netbox_devices.ports.csv
ChassisID,PortID,Description,LocationID
00-53-00-d2-f7-80,Gi1/0/1,rm 102,27ff9119-812b-4cb6-84e7-ee125013014b
00-53-00-d2-f1-00,Gi1/0/1,rm 102,27ff9119-812b-4cb6-84e7-ee125013014b
The output file can be directly imported into Teams using the Set-CsOnlineLisPort PowerShell cmdlet.
foreach ($port in Import-Csv -Path "netbox_devices.ports.csv" ) {
    $port | Set-CsOnlineLisPort -PortID $port.portID -Description $port.Description -LocationId $port.LocationID
}
E911_Teams_WirelessAccessPoints
The WirelessAccessPoints export is associated with the Netbox device object and generates a CSV file for import into Teams.
---
content_type: dcim.device
name: E911_Teams_WirelessAccessPoints
description: For import into Teams
mime_type: text/csv
file_extension: aps.csv
as_attachment: true
BSSID,Description,LocationID
{# statically set `num_ssids` to total count of SSIDs in the organization -#}
{% set num_ssids = 4 -%}
{% for ap in queryset | selectattr('device_role.slug', 'equalto', 'access-point') -%}
{%     set descr = ap.name -%}
{%     set loc = ap.location.cf.e911_guid -%}
{%     for iface in ap.interfaces.all() | selectattr('rf_role', 'equalto', 'ap') | selectattr('mac_address') -%}
{%         set descr = descr ~ " " ~ iface.name -%}
{%         set octets = iface.mac_address.format().split('-')[:-1] -%}
{%         set last = iface.mac_address.format().split('-')[-1] -%}
{%         for n in range(num_ssids) -%}
{%             set octets = octets + [ "%.2X" | format(last | int(base=16) + n) ] -%}
{%             set bssid = '-'.join(octets) -%}
{{ bssid }},{{ descr }},{{ loc }}
{%         endfor -%}
{%     endfor -%}
{% endfor -%}
For every radio interface on each access point (AP) device, output
a record. The base BSSID is stored in the interface mac_address
attribute. Each subsequent SSID on that radio has the last octet in
its MAC address incremented by 1. We have the same number of SSIDs
everywhere, so we hardcode this in the template. The description and
location are the AP name and is the GUID of the AP’s location.
$ head -10 netbox_devices.aps.csv
BSSID,Description,LocationID
00-53-00-C5-FF-50,orkan-ap-1 radio0,73877105-2cdf-4df3-923f-1b9bfe61b8d4
00-53-00-C5-FF-51,orkan-ap-1 radio0,73877105-2cdf-4df3-923f-1b9bfe61b8d4
00-53-00-C5-FF-52,orkan-ap-1 radio0,73877105-2cdf-4df3-923f-1b9bfe61b8d4
00-53-00-C5-FF-53,orkan-ap-1 radio0,73877105-2cdf-4df3-923f-1b9bfe61b8d4
00-53-00-C5-FF-40,orkan-ap-1 radio1,73877105-2cdf-4df3-923f-1b9bfe61b8d4
00-53-00-C5-FF-41,orkan-ap-1 radio1,73877105-2cdf-4df3-923f-1b9bfe61b8d4
00-53-00-C5-FF-42,orkan-ap-1 radio1,73877105-2cdf-4df3-923f-1b9bfe61b8d4
00-53-00-C5-FF-43,orkan-ap-1 radio1,73877105-2cdf-4df3-923f-1b9bfe61b8d4
00-53-00-C5-F6-F0,orkan-ap-2 radio0,73877105-2cdf-4df3-923f-1b9bfe61b8d4
00-53-00-C5-F6-F1,orkan-ap-2 radio0,73877105-2cdf-4df3-923f-1b9bfe61b8d4
The output file can be directly imported into Teams using the Set-CsOnlineLisWirelessAccessPoint PowerShell cmdlet.
foreach ($ap in Import-Csv -Path "netbox_devices.aps.csv" ) {
    $ap | Set-CsOnlineLisWirelessAccessPoint -Description $ap.Description -LocationId $ap.LocationID
}
E911_EGW_ERLs
The ERL export is associated with the Netbox location object and generates a CSV file for import into the EGW.
---
content_type: dcim.location
name: E911_EGW_ERLs
description: For import into Emergency Gateway
mime_type: text/csv
file_extension: erls.csv
as_attachment: true
operation,erl_id,HNO,RD,LOC,A3,A1,country,PC,NAM,security_desk,crisis_email,url_data
{% set operation = 1 %}{# operation: 1 => create/update, 2 => delete -#}
{% set nam = 'Splinking University' %}{# customer name: displayed at PSAP -#}
{% set security_desk = 'commcenter' %}{# security desk group name (from EGW dashboard) -#}
{% set crisis_email = 'security@example.net' %}{# comma-separate email addresses of monitoring personnel -#}
{% macro erl_id(obj) -%}
{{ obj.cf.e911_elin }}
{%- endmacro -%}
{% macro url(site) -%}
https://maps.google.com/?q={{ site.latitude }},{{ site.longitude }}
{%- endmacro -%}
{% macro address(site, loc, country="USA") -%}
{%     set street,city,statezip = site.physical_address.split(',') -%}
{%     set hno = street.split()[0] %}{# house number -#}
{%     set rd = street.split()[1:] | join(' ') %}{# street name -#}
{%     set a3 = city.strip() -%}
{%     set a1 = statezip.split()[0:-1] | join(' ') -%}
{%     set pc = statezip.split()[-1] %}{# zip code -#}
"{{ hno }}","{{ rd }}","{{ loc }}","{{ a3 }}","{{ a1 }}","{{ country }}","{{ pc }}"
{%- endmacro -%}
{% for site in queryset | map(attribute='site') | rejectattr('cf.e911_display', 'equalto', None) | unique -%}
{%     set loc = site.cf.e911_display -%}
"{{ operation }}","{{ erl_id(site) }}",{{ address(site, loc) }},"{{ nam }}","{{ security_desk }}","{{ crisis_email }}","{{ url(site) }}"
{% endfor -%}
{% for location in queryset | rejectattr('cf.e911_display', 'equalto', None) -%}
{%     set loc = location.site.cf.e911_display ~ ' ' ~ location.cf.e911_display -%}
"{{ operation }}","{{ erl_id(location) }}",{{ address(location.site, loc) }},"{{ nam }}","{{ security_desk }}","{{ crisis_email }}","{{ url(location.site) }}"
{% endfor -%}
In the Intrado data model, buildings (sites) and locations (floors,
etc.) are all in the same table. The export template has two for
loops, one for the sites and one for the locations. To keep the code
DRY, I’ve used some jinja macros for the common fields. As with
the Teams export, the NetBox physical_address attribute is parsed into
the multiple EGW fields.
$ cat netbox_locations.erls.csv
operation,erl_id,HNO,RD,LOC,A3,A1,country,PC,NAM,security_desk,crisis_email,url_data
"1","ORKAN","1619","Pine Street","Orkan House","Boulder","CO","USA","80302","Splinking University","commcenter","security@example.net","https://maps.google.com/?q=40.021582,-105.274956"
"1","ORKAN_FL01","1619","Pine Street","Orkan House 1st Floor","Boulder","CO","USA","80302","Splinking University","commcenter","security@example.net","https://maps.google.com/?q=40.021582,-105.274956"
"1","ORKAN_FL02","1619","Pine Street","Orkan House 2nd Floor","Boulder","CO","USA","80302","Splinking University","commcenter","security@example.net","https://maps.google.com/?q=40.021582,-105.274956"
"1","ORKAN_FL03","1619","Pine Street","Orkan House 3rd Floor","Boulder","CO","USA","80302","Splinking University","commcenter","security@example.net","https://maps.google.com/?q=40.021582,-105.274956"
"1","ORKAN_FL04","1619","Pine Street","Orkan House 4th Floor","Boulder","CO","USA","80302","Splinking University","commcenter","security@example.net","https://maps.google.com/?q=40.021582,-105.274956"
"1","ORKAN_FL00","1619","Pine Street","Orkan House Basement","Boulder","CO","USA","80302","Splinking University","commcenter","security@example.net","https://maps.google.com/?q=40.021582,-105.274956"
"1","ORKAN_EXT","1619","Pine Street","Orkan House Exterior","Boulder","CO","USA","80302","Splinking University","commcenter","security@example.net","https://maps.google.com/?q=40.021582,-105.274956"
The output can be directly imported into Intrado using the EGW dashboard.
- Under the “Provisioning” tab, choose the “ERLs” sub-tab and click the “Batch” button.
- From the “ERLs Batch Upload” panel, choose file and upload. The file should now show at the top of the “Batch Logs” panel.
- Click the “Batch Process” button in the Actions column of the uploaded file. The Status column should change from “Not Processed” to “Batch Successful”.
- If it is “Batch Failed”, there will be a “View Log File” link in the Error Log File column to assist in troubleshooting.

This same task can be performed programmatically via the SOAP API using pyegw.
import egw
from csv import DictReader
from os import environ

e = egw.api("egw.example.net", "egw_apiuser", environ.get("EGW_PASS"))

with open("netbox_locations.erls.csv") as f:
    for record in DictReader(f):
        csv = e.locations.from_dict(record)
        db = e.locations.get_single(csv.erl_id)
        if not e.locations.compare(csv, db):
            if e.locations.set(csv):
                print(f"{csv.erl_id} updated")
            else:
                print(f"{csv.erl_id} update failed")
E911_EGW_Switches
The EGW Switches export is associated with the Netbox device object and generates a CSV file for import into the EGW.
---
content_type: dcim.device
name: E911_EGW_Switches
description: For import into Emergency Gateway
mime_type: text/csv
file_extension: egwswitches.csv
as_attachment: true
switch_ip,snmp_community,description,erl_id,port_name,is_scan,switch_type
{% set is_scan = 1 -%}
{% set switch_type = "Cisco.js" -%}
{% for dev in queryset | selectattr('device_role.slug', 'equalto', 'access') | rejectattr('site.cf.e911_display', 'equalto', None) if dev.virtual_chassis.master == dev -%}
{%     set ip = dev.primary_ip.address.ip -%}
{%     set conf = dev.get_config_context() -%}
{%     set snmp_community = conf.snmp | selectattr('scope', 'eq', 'egw') | map(attribute='community') | first -%}
{%     set port_name = '*' -%}
{%     set description = dev.virtual_chassis -%}
{%     set erl_id = dev.site.cf.e911_elin -%}
{# switch record -#}
{{ ip }},"{{ snmp_community }}",{{ description }},{{ erl_id }},{{ port_name }},{{ is_scan }},{{ switch_type }}
{%     for sw in dev.virtual_chassis.members.all() -%}
{%         for iface in sw.interfaces.filter(mgmt_only=False,enabled=True,mode='access') | selectattr('link.status', 'eq', 'connected') -%}
{%             set port_name = iface.name.replace('GigabitEthernet', 'Gi') -%}
{%             set description = "" %}{# EGW data model has no per-port description -#}
{%             set erl_id = iface.path.last_node.device.location.cf.e911_elin -%}
{# interface record -#}
{{ ip }},"{{ snmp_community }}",{{ description }},{{ erl_id }},{{ port_name }},{{ is_scan }},{{ switch_type }}
{%         endfor -%}
{%     endfor -%}
{% endfor -%}k
In the Intrado data model, switches and ports are all in the same
table. The export template has two for loops, one for the switches,
with a port_name value of *, and one for the interfaces, with the
port_name value as sent by LLDP. The switch records use the site’s
ELIN, while the interface records use the ELIN of the location of the
faceplate connected to that interface. The EGW uses the management
IP of the switch (as sent by LLDP) as the switch identifier, which –
unlike the chassis MAC – is consistent during the entire lifetime of
the switch stack.
A SNMP community string is provided so that the EGW can periodically poll the switch to discover any switch ports that are not in its database. To avoid storing passwords in plaintext in the template, NetBox configuration contexts are used. This also permits using different values across separate groups of devices.
$ head netbox_devices.egwswitches.csv
switch_ip,snmp_community,description,erl_id,port_name,is_scan,switch_type
10.13.16.1,"public",orkan-sw-1,ORKAN,*,1,Cisco.js
10.13.16.1,"public",,ORKAN_FL01,Gi1/0/1,1,Cisco.js
10.13.16.1,"public",,ORKAN_FL02,Gi1/0/2,1,Cisco.js
10.13.16.1,"public",,ORKAN_FL00,Gi1/0/3,1,Cisco.js
10.13.16.1,"public",,ORKAN_FL00,Gi1/0/4,1,Cisco.js
10.13.16.1,"public",,ORKAN_FL01,Gi1/0/5,1,Cisco.js
10.13.16.1,"public",,ORKAN_FL02,Gi1/0/6,1,Cisco.js
10.13.16.1,"public",,ORKAN_FL00,Gi1/0/7,1,Cisco.js
10.13.16.1,"public",,ORKAN_FL00,Gi1/0/8,1,Cisco.js
The output can be directly imported into Intrado using the EGW dashboard.
- Under the “Auto Discovery” tab, choose the “Layer 2 Discovery” sub-tab, and click the “Switch” button.
- At the bottom of the “Current Switch List” panel, click the “Import” button.
- In the dialog that pops ups, click the “Add Files” button, and choose the file(s).
- Click the “Start Upload” button.
- Click the “Validate” “button.
- If “Validation Results: Success”, then click the “Import” button.
- If “Import Results: Success”, then click the “Finish” button.
- The Status column in the “File Import History” panel will show the updated status and link to the Log File for troubleshooting.

This same task can be performed programmatically via the SOAP API using pyegw.
import egw
from csv import DictReader
from os import environ

e = egw.api("egw.example.net", "egw_apiuser", environ.get("EGW_PASS"))

with open("netbox_devices.egwswitches.csv") as f:
    for record in DictReader(f):
        csv = e.switches.from_dict(record)
        if not e.switches.compare(csv):
            e.switches.set(csv)
    e.switches.delete_remaining()
E911_EGW_Subnets
The EGW Subnets export is associated with the Netbox prefix object and generates a CSV file for import into the EGW.
---
content_type: ipam.prefix
name: E911_EGW_Subnets
description: For import into Emergency Gateway
mime_type: text/csv
file_extension: egwsubnets.csv
as_attachment: true
operation,erl_id,subnet
{% set operation = 1 %}{# operation: 1 => create/update, 2 => delete -#}
{% set vrfs = ['administrative', 'academic', 'student', 'iptel' ] -%}
{% for erl_id, prefixes in queryset | rejectattr('vlan', 'none') | selectattr('vlan.group.scope.cf.e911_elin') | groupby("vlan.group.scope.cf.e911_elin") -%}
{%     set subnets = prefixes | selectattr('vrf.name', 'in', vrfs) | selectattr('family', 'eq', 4) | join(',') -%}
{{ operation }},{{ erl_id }},"{{ subnets }}"
{% endfor %}
The EGW expects one record per location (erl_id), with all subnets
for that location listed in the same (comma-separated) field. This is
accomplished using a groupby filter and a join on the resulting
list. Prefixes are limited to those associated with VRFs that could
have a phone connected. Only IPv4 prefixes are exported, since Intrado
does not support IPv6 (at least as of version 5.6.3.222). The default
__repr__ for the Netaddr object, CIDR notation, matches what is
expected by the EGW, so no special formatting is needed.
$ cat netbox_prefixes.egwsubnets.csv
operation,erl_id,subnet
1,ORKAN,"198.51.100.0/24,203.0.113.0/24,10.90.16.0/24"
The output can be directly imported into Intrado using the EGW dashboard.
- Under the “Auto Discovery” tab, choose the “Layer 3 Discovery” sub-tab, and click the “Switch” button.
- In the “Layer 3 Discovery” panel, click the “Batch Upload” button.
- In the “Subnets Batch Upload” panel, choose file and upload. The file should now show at the top of the “Batch Logs” panel.
- Click the “Batch Process” button in the Actions column of the uploaded file. The Status column should change from “Not Processed” to “Batch Successful”.
- If it is “Batch Failed”, there will be a “View Log File” link in the Error Log File column to assist in troubleshooting.

This same task can be performed programmatically via the SOAP API using pyegw.
import egw
from csv import DictReader
from os import environ

e = egw.api("egw.example.net", "egw_apiuser", environ.get("EGW_PASS"))

with open("netbox_devices.egwswitches.csv") as f:
    for record in DictReader(f):
        csv = e.switches.from_dict(record)
        if not e.switches.compare(csv):
            e.switches.set(csv)
    e.switches.delete_remaining()
E911_EGW_Analog
The EGW Analog export is associated with the Netbox device object and
generates a semicolon-delimited text file for import into the EGW.
Note that this is not a CSV file, and the file extension must be as
shown. The EGW will report that a file with anything other than a
.txt extension, even if the content is valid, as “corrupted.”
---
content_type: dcim.device
name: E911_EGW_Analog
description: For import into Emergency Gateway
mime_type: text/plain
file_extension: egwanalog.txt
as_attachment: true
{% set operation = 1 %}{# operation: 1 => create/update, 2 => delete -#}
{% set pbx_name = 'Cisco' -%}
{% for dev in queryset | selectattr('device_role.slug', 'equalto', 'vgw') -%}
{%     for iface in dev.interfaces.filter(enabled=True,name__startswith='voice-port') | selectattr('path') | selectattr('path.last_node.device.location') | selectattr('path.last_node.device.location.cf.e911_elin') -%}
{%         set extension = iface.label -%}
{%         set erl_id = iface.path.last_node.device.location.cf.e911_elin -%}
{%         set descr = iface.description -%}
{{ operation }};{{ pbx_name }};{{ extension }};;{{ erl_id }};;{{ descr }};;
{%     endfor -%}
{% endfor -%}
In NetBox, we have modeled analog lines as served by a “Voice Gateway”
device with multiple voice-port interfaces. Each interface is cabled
to a “faceplate” device with a location set to the location in the
building. Filtering for these interfaces on devices of role vgw and
limiting to the ones cabled to a device with a location that has a ELIN
defined exports all the analog lines. The interface label field is
overloaded to store the phone extension.
$ cat netbox_devices.egwanalog.csv
1;Cisco;7242;;ORKAN_FL01;;Orkan House - 1st Floor Emergency;;
1;Cisco;7243;;ORKAN_FL02;;Orkan House - 2nd Floor Emergency;;
1;Cisco;7244;;ORKAN_FL03;;Orkan House - 3rd Floor Emergency;;
1;Cisco;7222;;ORKAN_FL00;;Orkan House - Elevator Emergency;;
The output can be directly imported into Intrado using the EGW dashboard.
- Under the “Provisioning” tab, choose the “Endpoints” sub-tab and click the “Batch” button.
- From the “Endpoints Batch Upload” panel, choose file and upload. The file should now show at the top of the “Batch Logs” panel.
- Click the “Batch Process” button in the Actions column of the uploaded file. The Status column should change from “Not Processed” to “Batch Successful”.
- If it is “Batch Failed”, there will be a “View Log File” link in the Error Log File column to assist in troubleshooting.

This same task can be performed programmatically via the SOAP API using pyegw.
import egw
from csv import DictReader
from os import environ

e = egw.api("egw.example.net", "egw_apiuser", environ.get("EGW_PASS"))

with open("netbox_devices.egwanalog.txt") as f:
    fields = "operation", "ip_pbx_name", "endpoint", "mac_address", "erl_id", "ip_address", "display_name"
    for record in DictReader(f, fieldnames=fields, delimiter=";"):
        csv = e.endpoints.from_dict(record)
        if not e.endpoints.compare(csv):
            e.endpoints.set(csv)
Import scripts
update-access-points
To get the BSSID information into NetBox, a script periodically runs to poll the deployed infrastructure for all current APs and the base MAC address for each of their active radios. These radio interfaces are updated/created so that they can be exported into Teams.
Part of a larger script validating other organization-specific
data, here is the (simplified) function that queries the Aruba
Airwave ap_list XML API to get all the required information:
import requests
import xmltodict


def ap_info():
    HEADERS = {
        "Content-Type": "application/x-www-form-urlencoded",
        "Cache-Control": "no-cache",
    }
    amp = requests.Session()
    amp.post(
        f"https://{AIRWAVE}/LOGIN",
        headers=HEADERS,
        data=f"credential_0={AIRWAVE_USER}&credential_1={AIRWAVE_PASS}&destination=/&login=Log In",
    )
    return {
        ap["name"]: dict(
            model=ap["model"]["#text"].replace(" ", "-"),
            serial=ap.get("serial_number"),
            ip=ap["lan_ip"],
            radios=[
                dict(
                    interface_name=f"radio{int(radio['radio_interface'])-1}",
                    radio_type=radio["radio_type"],
                    mac=radio["radio_mac"],
                    enabled=radio.get("enabled") == "true",
                )
                for radio in ap["radio"]
            ],
        )
        for ap in xmltodict.parse(
            amp.get(f"https://{AIRWAVE}/ap_list.xml", headers=HEADERS).content
        )["amp:amp_ap_list"]["ap"]
        if ap["group"]["#text"] == "Campus"
    }
update-e911-guids
When any CivicAddresses or Locations are added to Teams, unique identifiers (GUIDS) are created. These must be imported into NetBox so that they can be referenced by the other export templates. In our deployment, the data from the aggregation site also needs to be copied to the associated site group.
Here’s a (simplified) script we use to update this data in NetBox:
#!/usr/bin/env python
import sys
from csv import DictReader
from os import environ

import pynetbox

url = "https://" + str(environ.get("NETBOX_HOST"))
nb = pynetbox.api(url, environ.get("NETBOX_TOKEN"))


def main():
    for line in readcsv(sys.argv[1]):
        elin = line["Elin"]
        custom_fields = {}

        if not elin:
            continue
        obj_type = siteloc(elin)
        obj = obj_type.get(cf_e911_elin=elin)
        if not obj:
            print(f"{elin}: no such object")
            continue

        if obj_type.name == "locations":
            if obj.custom_fields["e911_guid"] != line["LocationId"]:
                custom_fields["e911_guid"] = line["LocationId"]
        elif obj_type.name == "sites" and line.get("CivicAddressId"):
            if obj.custom_fields["e911_guid"] != line["CivicAddressId"]:
                custom_fields["e911_guid"] = line["CivicAddressId"]
            if obj.custom_fields["e911_default_location"] != line["DefaultLocationId"]:
                custom_fields["e911_default_location"] = line["DefaultLocationId"]

        if custom_fields and obj.update(dict(custom_fields=custom_fields)):
            print(f"{elin}: {', '.join(custom_fields.keys())} updated")
            if obj_type.name == "sites" and line.get("CivicAddressId"):
                obj.full_details()  # other custom fields disappear after an update(), refresh
                if obj.custom_fields.get(
                    "aggregation_site"
                ) and nb.dcim.site_groups.get(id=obj.group.id).update(
                    dict(custom_fields=custom_fields)
                ):
                    print(
                        f"{elin}: {', '.join(custom_fields.keys())} copied to sitegroup {obj.group}"
                    )


def siteloc(elin):
    if "_" in elin:
        return nb.dcim.locations
    else:
        return nb.dcim.sites


def readcsv(file):
    with open(file) as f:
        for record in DictReader(f):
            yield record


if __name__ == "__main__":
    main()
Conclusions
To be honest, I almost didn’t post this. It is too long, and I’ve had trouble conveying the important details without rambling on too much. On the other hand, I would have loved to have had this information when I initially embarked on this journey, so I’ll leave it here for anyone interested.
I believe this solution could be better implemented as a NetBox plugin. At the outset, I expected that the export templates would be much simpler and be able to maintained/updated by someone with little coding experience. That still may be the case, but during implementation I found that the mismatch in data models required them to be more complex than I had originally expected. I’m planning to review the recently-published plugin tutorial and may use this E911 project as an example use case. I’ll be certain to write that up if I do.
Many of the export templates are written inefficiently. I discovered late in the project that the jinja template has access to the full Django ORM. By building more complex QuerySets, much of the work can be moved to the database layer, significantly reducing time and computation load.
Overall, this solution works well for our organization. It meets the design requirement to make it easy for the network team to continue using NetBox as the source of truth for the physical plant, and gives other systems and teams self-service access to the data they want in the format they require for both manual and automated integrations.