Background
In the last post, I documented an approach to fan-out GitHub repository updates to AWS services using API Gateway, Lambda, and SNS. In my conclusion, I wrote:
The whole time I was building and testing this, I kept thinking to myself, “I must be overlooking a more obvious solution.” I’ve asked around, and it seems that others have also run into this issue, but ended up using a different approach that didn’t involve authorization. If you know of a better/different solution, please reach out!
No one reached out, but my brain didn’t stop thinking about it. I’ve found a much more elegant solution using the AWS CodePipeline continuous delivery service with AWS CodeStar connections. I think I had avoided this whole group of services because I assumed that it would be complex. Because the GitHub connection is a GitHub App, it handles all the authentication complexity for you.
The Design
The previous design built a REST API endpoint with API Gateway which forwarded requests to a custom Lambda. The custom code verified the authorization signature and then published to an SNS topic. It worked, but felt like I was using the wrong tools for the job.

Previous Design Attempt
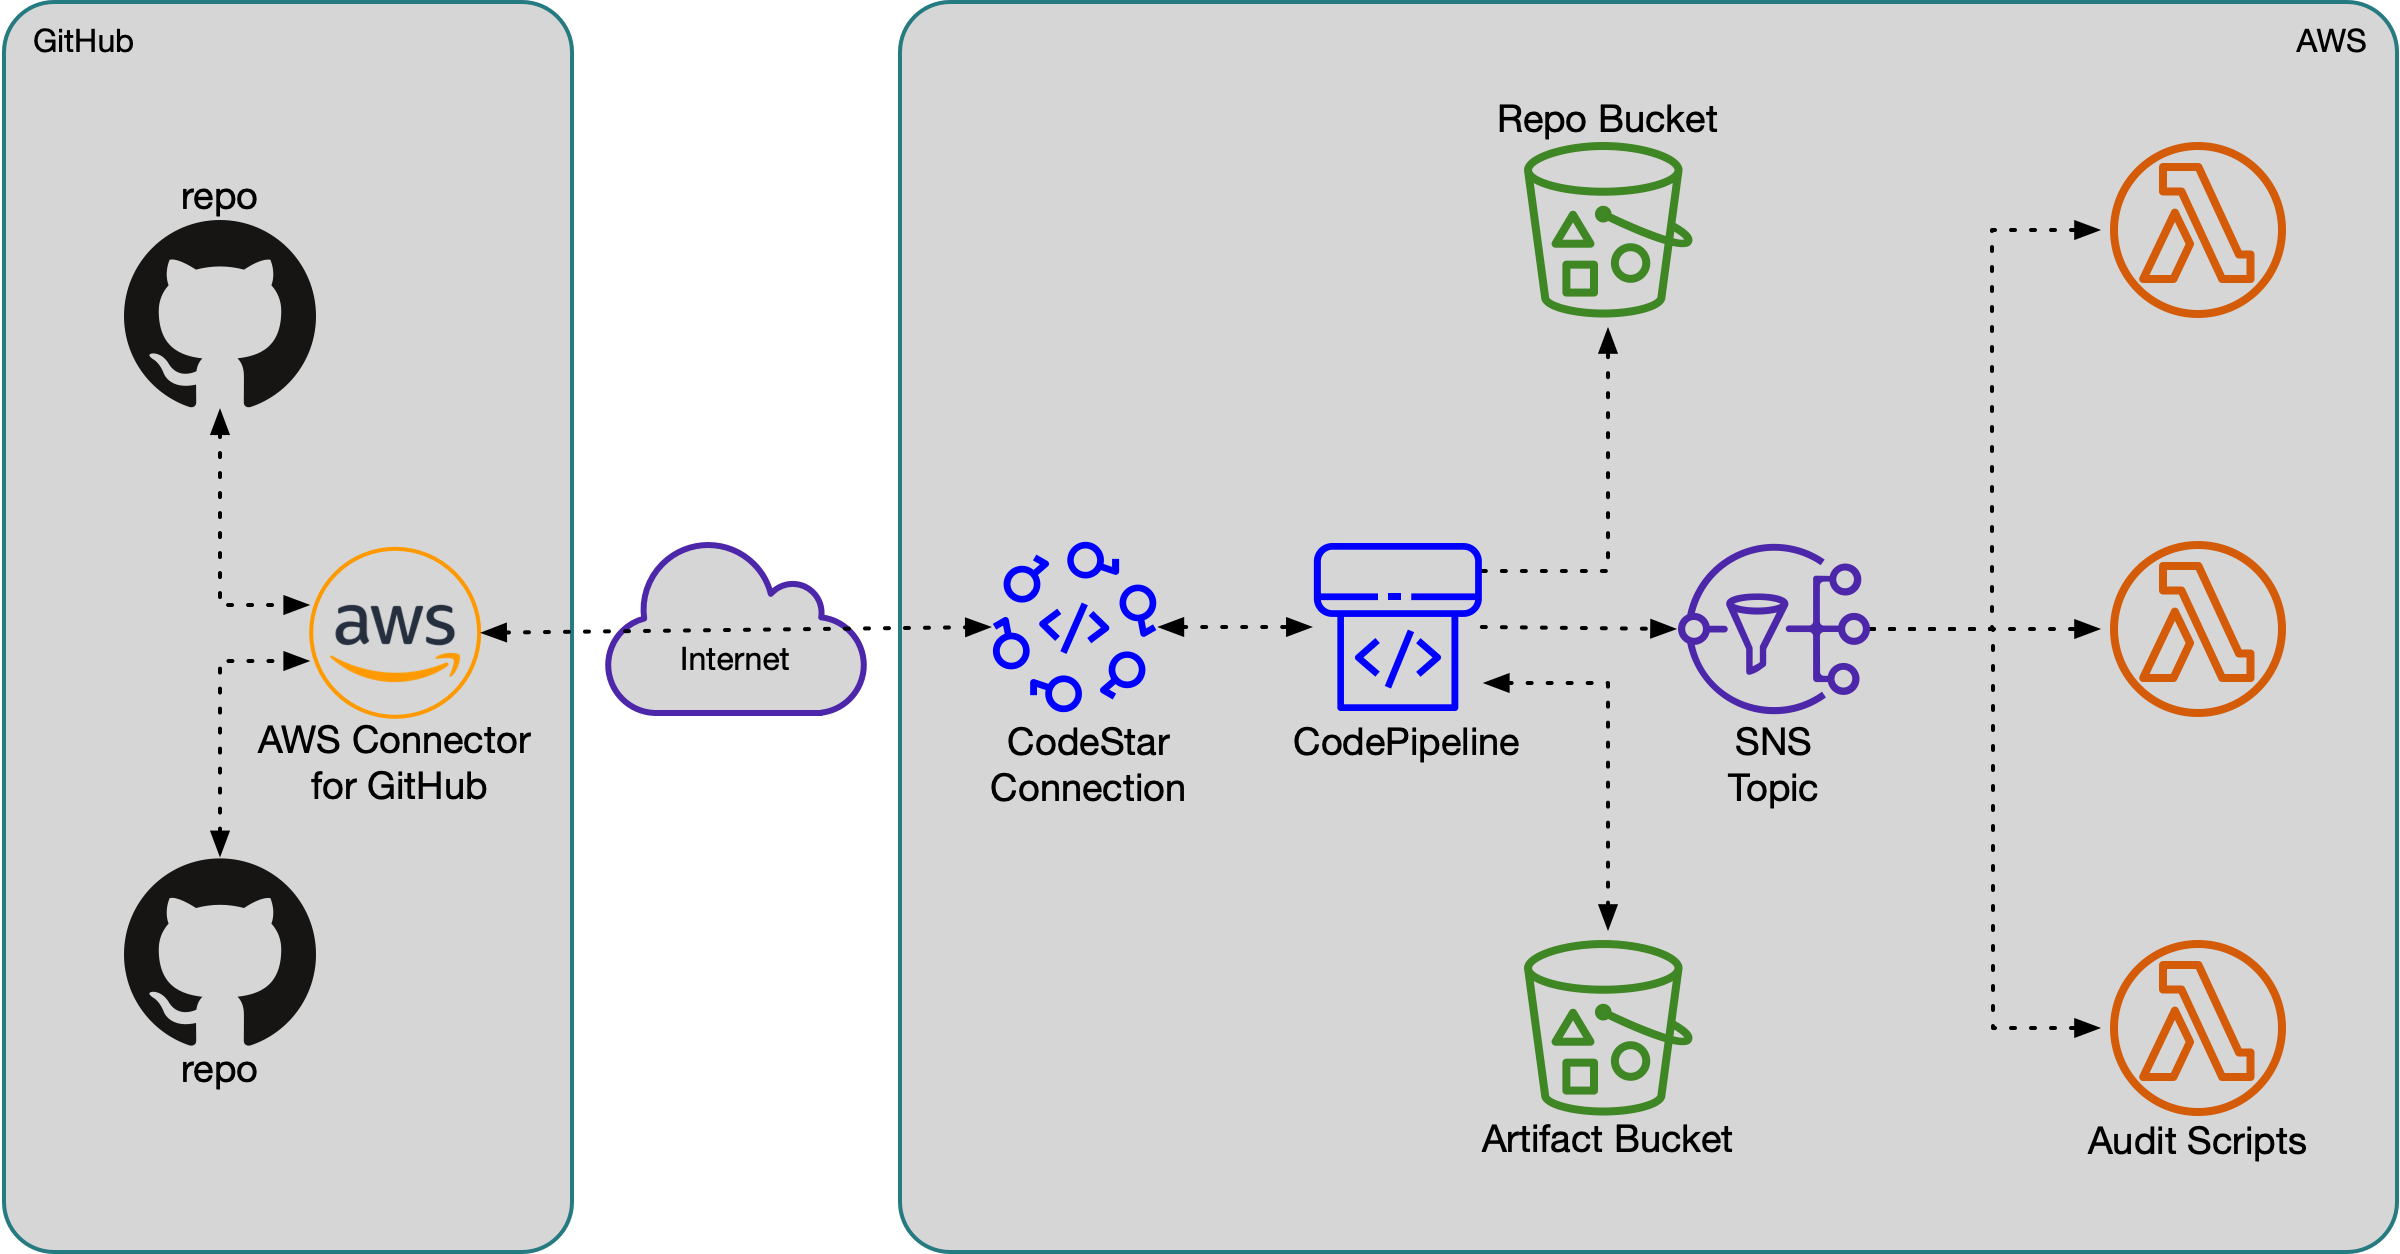
This solution connects an “AWS Connector” GitHub App to a simple two-stage pipeline that clones the repo to an S3 bucket. A single notification rule publishes these changes to an SNS topic. I know there are more icons in the block diagram, but – trust me – the code is much simpler to follow. It also makes available a copy of the repository in an S3 bucket, a step which in the previous design would have needed to be done separately, possibly by the Audit Scripts themselves. This approach feels much more elegant, like we are using the services as they were intended and designed to be used.

An Improved Approach
The rest of the post details how to build this solution with Terraform, broken down by AWS service.
S3 Buckets
This solution uses two S3 buckets. One will be for CodePipeline to
store artifacts (the zip file of the repository) to pass between the
Source and Deploy stages. The second “Repo Bucket” is be where
the Deploy stage will unpack the GitHub repository (as a shallow
clone).
resource "aws_s3_bucket" "artifacts" {
  bucket = "${var.name}-codepipeline-artifacts"
  acl    = "private"
}

resource "aws_s3_bucket" "repos" {
  bucket = "${var.name}-repos"
  acl    = "private"
}
GitHub Connection and App Installation
Rather than using a webhook as in the API Gateway scenario, CodeStar Connections offers a GitHub App that allows an active integration between the AWS account and the GitHub organization. This is superior because it does not require OAuth Apps or webhook secrets (and signature verification code), nor does it require an access token to be stored and managed in AWS or Terraform.
resource "aws_codestarconnections_connection" "github" {
  name          = "${var.name}-connection"
  provider_type = "GitHub"
}
According to the documentation, even though you can create and manage the connection resource in Terraform, you will still have to manually authorize the connector in the AWS Console:
A connection created through the AWS CLI or AWS CloudFormation is in PENDING status by default. After you create a connection with the CLI or AWS CloudFormation, use the console to edit the connection to make its status AVAILABLE.
Once the connection is built, go to the console to activate.

Click on the connection name.

Click on “Update pending connection.”

From the “Connect to GitHub” dialog click “Install a new app”. (If the GitHub App was installed previously, you can select it from the left-hand drop down menu.)

You are redirected to the GitHub App install page. Select the GitHub account or organization you want to connect to.

Select “All repositories” or (multiple) individual repositories, and click “Install”. This can be changed later in GitHub.
You will then be redirected back to the AWS console where you can click the “Connect” button and the connection status will change from Pending to Available. While it is disappointing this this cannot be automated via Terraform, Cloud Formation, or even the AWS CLI, this only needs to be done once for each organization and the GitHub App can be re-used for any integrations in the account.
IAM Role and Policy
Create an IAM role for CodePipeline which will give it access to the resources it needs. It will need to use the GitHub connection from above, as well as write to the S3 buckets.
data "aws_iam_policy_document" "codepipeline" {
  statement {
    actions = ["s3:*"]
    resources = [
      aws_s3_bucket.artifacts.arn, "${aws_s3_bucket.artifacts.arn}/*",
      aws_s3_bucket.repos.arn, "${aws_s3_bucket.repos.arn}/*",
    ]
    effect = "Allow"
  }
  statement {
    actions   = ["codestar-connections:UseConnection"]
    resources = [aws_codestarconnections_connection.github.arn]
    effect    = "Allow"
  }
}

data "aws_iam_policy_document" "assume-codepipeline" {
  statement {
    actions = ["sts:AssumeRole"]
    principals {
      type        = "Service"
      identifiers = ["codepipeline.amazonaws.com"]
    }
    effect = "Allow"
  }
}

resource "aws_iam_role" "assume-codepipeline" {
  name               = "assume-codepipeline"
  assume_role_policy = data.aws_iam_policy_document.assume-codepipeline.json
  inline_policy {
    name   = "coepipeline"
    policy = data.aws_iam_policy_document.codepipeline.json
  }
}
CodePipeline Pipeline
This is the fun part. We only scratch the surface of what CodePipeline
can do, but it does this part well. We define two stages. The Source
stage connects to GitHub and creates a zip file of HEAD of the named
branch whenever it is updated, and writes it to the “Artifacts” bucket.
Then, the Deploy stage extracts that to the “Repos” bucket.
The FullRepositoryId configuration option expects a format of
orgname/reponame.
Note the ObjectKey configuration option. This string will prefix the
key of all the extracted objects. This will be useful to use the same
bucket to extract multiple repositories.
resource "aws_codepipeline" "pipeline" {
  name     = var.name
  role_arn = aws_iam_role.assume-codepipeline.arn

  artifact_store {
    type     = "S3"
    location = aws_s3_bucket.artifacts.id
  }

  stage {
    name = "Source"
    action {
      category         = "Source"
      name             = "Source"
      version          = "1"
      output_artifacts = ["SourceArtifact"]
      owner            = "AWS"
      provider         = "CodeStarSourceConnection"
      configuration = {
        ConnectionArn    = aws_codestarconnections_connection.github.arn
        FullRepositoryId = var.repository
        BranchName       = "main"
      }
    }
  }

  stage {
    name = "Deploy"
    action {
      category        = "Deploy"
      name            = "Deploy"
      version         = "1"
      input_artifacts = ["SourceArtifact"]
      owner           = "AWS"
      provider        = "S3"
      configuration = {
        "BucketName" = aws_s3_bucket.repos.id
        "Extract"    = "true"
        "ObjectKey"  = "some/prefix"
      }
    }
  }

}

The pipeline runs once upon creation. Any changes to the source GitHub repository will trigger the pipeline and update the content in the S3 bucket. You can manually trigger a run with the “Release Change” button.
SNS topic and CodeStart Notification
Create an SNS topic and attach a policy that allows publishing of CodeStar notifications. Create a notification rule that sends to SNS upon successful execution of the pipeline.
resource "aws_sns_topic" "topic" {
  name = "${var.name}-topic"
}

data "aws_iam_policy_document" "codestar-sns" {
  statement {
    actions = ["sns:Publish"]
    principals {
      type        = "Service"
      identifiers = ["codestar-notifications.amazonaws.com"]
    }
    resources = [aws_sns_topic.topic.arn]
  }
}

resource "aws_sns_topic_policy" "default" {
  arn    = aws_sns_topic.topic.arn
  policy = data.aws_iam_policy_document.codestar-sns.json
}

resource "aws_codestarnotifications_notification_rule" "commits" {
  detail_type    = "BASIC"
  event_type_ids = ["codepipeline-pipeline-pipeline-execution-succeeded"]
  name           = "${var.name}-pipeline-success"
  resource       = aws_codepipeline.pipeline.arn
  target {
    address = aws_sns_topic.topic.arn
  }
}
Now, any service can subscribe to this topic to be alerted when the GitHub repository has been updated. If the service needs it, the latest content of the repository is available at in the “Repos” S3 bucket.
Conclusion
For me, this has been a great example of Learning in Public. I first came up with a sub-optimal solution, and shared it widely. Soon after, I found a better approach which entirely replaced the first. It wasn’t all for naught as I learned a lot in the process. Hopefully anyone following along will learn something, too.
This is just a small component of a much larger project. I will continue to share interesting pieces – or at least those where I find no one has already written about – as I discover and build them.